Tuesday, January 26, 2010

Expandable post summaries on blogger

You want know how to create expandable post summaries on main page of your blogger blog? You want to display only few lines of text from the beginning of each post, and one read only link bellow each summary which is linking to the rest of article? With help of jump break blogspot feature it is very easy to accomplish it. "Jump break" feature is also called "After the Jump" feature lets you create expandable post summaries in your blog posts, so longer posts appear as an intro with a link to Read More.


"After the Jump" feature can be very handful when your blog contains long posts and you want to only show a selected snippet of each post on your homepage with Read More option to lead visitor to the complete post. In this guide you will learn how to implement Read more option to your blogger blog. Check articles with useful tips for blogger!


Insert read more in post


To insert read more link in your blog you need to put this code in Edit HTML on the place where you want to Read More link appear:


<!-- more -->

For sample of inserting <!-- more --> take a look for sample on this picture:

Inerting of Read more link for expanded summary in your post


When you publish your post, on your home page (caution: read more is visible only on main page of your blog, not on individual post page) only portion of text before <!-- more --> will be displayed with Read more link. Look for sample on this picture:

Blogger home page with Read more option


Change Read more text


Let's say you don't like "Read more" text for your link and want to change it to "Continue reading...". You can change post page link text directly from blog post widget. Follow those steps:

  • click Layout --> Page Elements

  • in "Blog Posts" click on Edit

    Blogger edit posts

  • Change Post page link text, for example to "Continue reading..."

    Post page link text in Configure blog posts

  • click Save in Configure blog posts widget and you will have new Read more text

For bloggers who use customized templates


If you are using customized template, Read more link will not be displayed. In this case you will have to make some changes in your blogger template. Here are instructions:


  • Go to Layout

  • Click on Layout --> Edit HTML

    Edit blogger template

  • it is recommended (wise) to backup template on local hard disk before doing any change in edit template box

  • click the Expand Widget Templates checkbox and find <data:post.body/>

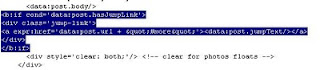
  • after <data:post.body/> paste this code snippet:

    <b:if cond='data:post.hasJumpLink'>
    <div class='jump-link'>
    <a expr:href='data:post.url + &quot;#more&quot;'><data:post.jumpText/></a>
    </div>
    </b:if>


  • it should look something like this:

    Update code for expandable summaries in blogger customized templates

  • save template and from now you should see Read more link on your main page

Tuesday, January 19, 2010

Scrolling text HTML code

Learn how to add scrolling text on your site or web page. Read this guide and you can make text to move horizontal or vertical. You just need to copy scrolling text HTML code from this page, adjust copied code and paste it to your HTML page.


To add scrolling text or images on web page use MARQUEE HTML tag. MARQUEE tag can work well for announcements. So, with MARQUEE tag you can easily get animated text effect on your page.


Take a look at scrolling text sample made with MARQUEE HTML code:


  MARQUEE scrolling text

  Link to my blog


In this tutorial you will find:

  • Simple scrolling text HTML code sample

  • How to change direction of animated text

  • Change style of scrolled text

  • How to stop scrolling on mouse over Marquee control

  • guide for implementing Marquee on blogspot (blogger)


Simple scrolling text HTML code sample


Code for scrolling text from left to right:


<marquee direction="right" behavior="scroll" scrollamount="1" >Simple marquee sample</marquee>


Result:

Simple marquee sample


Marquee direction attribute

Animated text can move left to right, right to left, up to down or down to up. Direction :

  • left - text is moving right to left

  • right - text is moving left to right

  • up - text is scrolled upward

  • down - text is scrolled form up to down


Scrollamount attribute - how fast text will be scrolled, higher number faster is scrolled

Change style of MARQUEE tag


You will probably want to limit area of Marquee effect on your site. You can do it with style attribute inside your MARQUEE HTML tag. You need to use height and width property. If you want visible border of your rectangle add border property to your style attribute.


Sample HTML code for MARQUEE limited to rectangle 100 x 200 with thin black border:


<marquee style="border: thin solid rgb(0, 0, 0); height: 100px; width: 200px;" direction="up">&nbsp;<a href="http://interestingwebs.blogspot.com/">Link to my blog</a></marquee>


Result:
 Link to my blog

You can use Marquee code HTML generator by clicking this link.

Stop scrolling when a mouse is over Marquee area


How to stop scrolling when a mouse hover scrolling text? To accomplish this task javascript event onmouseover will be used. Also javascript event onmouseout will be used to continue scrolling when mouse pointer lost focus of Marquee. To see how this work check first scrolling text sample at beginning of this article.


Sample code for stop scrolling text when mouse is over text and start scrolling text when focus is lost:


<marquee direction="right" behavior="scroll" onmouseover="this.stop();" onmouseout="this.start();">Simple marquee sample</marquee>


Tutorial for implementing Marquee on blogger (blogspot)


Add HTML code for Marquee element to blogger sidebar (for help visit this article : How to add HTML or JavaScript gadget to blogger


Here is code for Marquee sample from beginning of the article:


<marquee style="border: thin solid rgb(0, 0, 0); height: 120px; width: 200px; background-color: rgb(255, 255, 255); font-family: Arial; font-size: 10pt; color: rgb(0, 0, 0);" direction="up" behavior="scroll" scrollamount="1" onmouseover="this.stop();" onmouseout="this.start();">&nbsp; MARQUEE scrolling text<br /><br />&nbsp; <a href="http://interestingwebs.blogspot.com/">Link to my blog</a></marquee>

Marquee HTML tag can be used for announcements, but be carefully, one can be OK, but if there are too many visitor can get headache.

Bad news is that Marquee tag is obsolete in HTML5. To find out how to achieve HTML5 scrolling text effect visit article: HTML5 scrolling text.

Tuesday, January 12, 2010

Blog decisions in new year

In the end of 2009 I stopped publishing new posts because I get tired. After take about one month vacation it is time for new posts. For new year I set two goals. First goal is to regularly publish one new post every week on tuesday. Second goal is to publish guest posts on blogs more famous then my blog and to track how this action impact on my web traffic.


Publish post once a week


This is a goal that I believe it is possible for me to achieve. My intention is to publish once a week every tuesday and keep that rhythm. If I miss to publish new article on one tuesday, then I will continue to prepare new articles and continue on next week. My thesis is that it is better to publish four articles in four weeks than four articles in firs week and than three weeks nothing for visitors and search engines. I believe it is good to keep same rhythm all the time, visitors will be used to check for new articles every tuesday.


When we are talking about blog publishing frequency there are some advices like to not publish on weekend and Public Holiday because of less visits on those days. One advice also say to not post anything for a while after very important post so your important post remains at the top of your blog.


Search engine likes blogs who publishes often and frequently. If your posts are published more frequently means more frequency of your content in Search Engines. You must be careful to not set for goal to publish too many posts per week (or day), you can burnout. My advice is to set reasonable goal and to keep regularity and rhythm. For example some magazines are published every week and you know that you can buy a new issue of magazine on specific day in week.


Publish guest posts


Publishing guest posts on blogs with high rate of visits can help your blog to become more known. First problem is to find someone who have web traffic and who is ready to publish your article with link to your blog. Currently I do not have experience with guest posting and its influence on guest poster blog web traffic but I think it have potential.

Monday, January 4, 2010

Do not count my visits in GA - cookies

Here is a guide how to exclude your visits from GA (Google Analytics) statistics with help of cookies. If you have static IP address you can learn how to exclude your IP address in google analytics by clicking this link. In linked article you can also find do you have static or dynamic IP address.


This tutorial for excluding your visits in GA is simpler than most other tutorials you can find on Internet about same topic. Main goal of this article is to help blogger users to count off their visits from GA records.


Exclude your own traffic from GA records with cookies


  • First go to web page you track with Google Analytics

  • copy code below and paste this code in address bar of you browser (don't forget to click enter)

    javascript:pageTracker._setVar('DoNotCount');alert('Cookie has been created')


  • With this line of code in browser address bar you will create cookie for visited site with content "DoNotCount" or other if you change colored text. If you want to check created cookie visit my article Check cookies on my computer


  • now you need to create filter


  • In your Google Analytics click Edit

    Edit in Google Analytics

  • Click Add filter in the Filters Applied to Profile box

    Add filter in Google Analytics


  • enter filter name, for filter type choose Custom filter, choose Exclude. For filter field choose User defined. For field pattern enter same text you set in javascript we paste in address bar (colored text, in our example: DoNotCount)

    Custom exclude filter for cookie in Google Analytics

  • now you need to wait few days and GA (Google analytics) will no more count your visits. This guide was tested on my blog and it works.

Saturday, December 5, 2009

How to use Google Sidewiki

In this article you can learn what is Sidewiki, how to install and use Sidewiki, how Google Sidewiki work and Sidewiki features, how to block Sidewiki and some (controversy) impressions about Sidewiki. I discover Sidewiki two days ago after after updating my Google toolbar. Sidewiki was launched in September 2009.


What is Sidewiki and how it is functioning


Google Sidewiki appears as a browser sidebar, where users can read and write comments about current web page. Sidewiki allows web surfers to leave comments about pages as they surf the web and to read Sidewiki comments leaved by other surfers. So if you have Sidewiki enabled you can view Sidewiki entries posted by surfers who visit web page before you.


Google Sidewiki toolbar

Now with help of Sidewiki every web page can be commented in one unique comment system. To see Sidewiki entries or add your own Sidewiki entrie you must have Sidewiki installed on your browser (Google toolbar or Sidewiki bookmarklet) and Google account. Sidewiki users can also rate Sidewiki entries. This rating is visible when a user click on more hypelink of some Sidewiki entry (Useful? yes, no)

Google Sidewiki rating after more is clicked


To summarize, Google Sidewiki user can:

  • view Sidewiki entries (comments) entered by others Sidewiki users for current web page

  • write his own Sidewiki entry about web site

  • rate existing Sidewiki entries

  • write Sidewiki entry about selected area of text


Install GoogleSidewiki


Prerequisites to use GoogleSidewiki:

  • you must have Google account

  • to use Sidewiki you need to install Google toolbar. Sidewiki is integrated in Google toolbar

  • if you don't want to install Google toolbar (privacy issue or any other issue) or your internet browser don't support Google toolbar you can use Sidewiki bookmarklet


How to use Google Sidewiki


To see Sidewiki entries visit some web page and click on Sidewiki icon on your Google toolbar or click on Open Sidewiki icon on left side of page.

Open Siedwiki entries


If you have signed up with google account you can write your own entries or rate entries of other Sidewiki users. If you are page owner, you can write a special entry that will remain the top entry for this page.

Google Sidewiki entry as page owner


Very interesting feature is to write Sidewiki entry for selected area of text on web page. Select some text and click on the write entry icon and you will write Sidewiki comment about selected text.

Write entry for selected text in Google Sidewiki


How Sidewiki order comments


The key factor in ordering Sidewiki entries are:

  • Use of sophisticated language

  • Sidewiki user’s reputation: Are user's comments being voted up or down, or reported as abuse?

  • Siedwiki user’s history

Profile rank is very important. Similar to PageRank that reflects web page authority, Google Profile have its own Profile rank which is important when Sidewiki ranking comments.


HTML in Sidewiki entries


You can ask yourself : Can I make hyperlinks in Google Sidewiki entries? Yes, you can.


Sidewiki support

  • font formatting tags such as bold tag - <b> tag

  • italicize tag - <i> tag

  • hyperlink tag - <a> tag

  • paragraph tag - <p> tag

  • break line tag <br /> tag


For complete list of supported HTML tags visit Using HTML in Sidewiki entries


Don't like Sidewiki and want to block Sidewiki on your page


For those who think Sidewiki is not welcome on their web site there is javascript code you can implement and Sidewiki entries will not be accessible.

<script type="text/javascript" src="http://www.sidewikispam.com/sidewikispam.js"></script>


With this code snippet you can stop side wiki spam (if you think that way). I found this code on sidewikispam blog. I make test on blogger and it works. In my opinion Sidewiki is welcome on my blog.


Thoughts about Siedwiki


  • Sidewiki, enables anyone to comment on any web page

  • Page owner can't control Sidewiki entries about his page, what if a page owner do not want anyone put comments about his web page?

  • Google have its own system to rate Sidewiki comments and order those comments (entries)

  • good rated Sidewiki entries are on the top of comment for web page, Sidewiki entries with bad rate will be buried and visitor will not see those entries, so Google decide which comment will stay for some web site

  • what if some inappropriate entry is on the top? Web owner can't delete it.

  • some bloggers claims that Google takes comments away from web sites and puts them on Google

  • what if someone in Google doesn't like some site and decide to show only negative comments for that site, yes they say it is a algorithm, but algorithms are written by people and can be used for manipulation

  • are Google capable to stop spammers who will try to use Sidewiki for their spam

Thursday, December 3, 2009

Very good blog

In this blog you can find many good tips about working with blogger templates. My advice is to explore this blog it will be worthwhile.

in reference to: The Blogger Guide (view on Google Sidewiki)

Sunday, November 29, 2009

Download entire website or images

This article can help surfers who want:

  • download all pages linked from selected page on their computer

  • or

  • download entire web site on a local computer

  • or

  • automatically download all images (and links to images) from specific page or web site

  • or

  • automatically download any other type of files from selected page or site


Purpose of this article is not to go in details but to give links to applications which can help surfer to move files from web to his local hard. There is no need for saving every file by hand - just enter the starting address, choose what files to save and let the program do the rest of the work.


Extreme picture finder - with this software you can download images, music, video or any other files from websites automatically. Application have "find pictures" feature with built-in web picture search engine. Simply type your search phrase, click "Search" button and you'll have thousands of pictures to choose from in just a few minutes.
Main purpose of Extreme picture finder is downloading images on your computer.
This is a best application for downloading images from web sites I found on Internet. Very intuitive, good designed and user friendly. Unfortunately it is not free, user license plus one year of free updates cost $29.95.
Luckily you can download free evaluation copy for 20 days.


WinHTTrack - this application is FREE.
Main purpose of WinHTTrack is downloading sites on your computer.
In my opinion it is not so user friendly as Extreme picture finder but it is very powerful application. It give user many features.
With this application user can:

  • Download web site(s)

  • Get individual files - Will only get the desired files you specify (for example, ZIP files), but will not spider through HTML files

  • Download all sites in pages


BackStreet Browser - It is a FREE, offline browser. Main purpose is viewing and downloading sites on your computer.
It is less intuitive then Extreme picture finder and less powerful then WinHTTrack. This application was very successfully download my blog so it can be used for backup blogs.
By making multiple simultaneous server requests, BackStreet Browser can quickly download entire website or part of a site including HTML, graphics, Java Applets, sound and other user definable files, and saves all the files in your hard drive, either in their native format, or as a compressed ZIP file and view offline.

Monday, November 23, 2009

Google analytics - exclude your traffic

You can't resist to click and inspect your own blog? Problem is that your actions influence your Google analytic statistics. Your internal traffic have impact on your google analytics reports and this is a reason you can't quality analyze trends on your blog. For example I just put awesome menu bar on my blog and want to see how my Page/Visit is going. But while I implementing and testing menu bar on my blog I clicked many times on it and because my Google analytics reports are not accurate.


In this article you will find:

  • how to learn your external IP address

  • does you have dynamic or static IP address

  • excluding your IP address in google analytics

  • exclude your traffic in google analytics with cookies (guide to exclude traffic in GA you can find in second part of article)


The most simplest way to exclude you internal traffic in google analytics is to exclude your IP address with filters. Excluding your IP address in google analytics works if you have fixed IP address.
Those who have dynamic IP address can find how to exclude their own internal traffic with cookies.


Find your external IP address


To learn your IP address go to whatismyip.com and you will see your IP addres on the top of a page.


Does you have static or dynamic IP address


Static IP address is fixed and therefore never changes. Dynamic external IP address can change when you connect to the internet. So you can check your external IP address with help of whatismyip.com, disconnect from Internet, connect to Internet and check again your external IP address with whatismyip.com. If IP addresses are same you have static external IP address, if IP addresses are different you have dynamic external IP address.


Exclude your IP address in google analytics


  • In your Google Analytics click Edit

    Edit in Google Analytics

  • Click Add filter in the Filters Applied to Profile box

    Add filter in Google Analytics

  • now enter filter name, under filter type chose traffic from the IP addresses and Save Changes

    Create new filter in google analytics

  • on the end all traffic coming from your IP address (if it is static) will be excluded from google analytics reports (after 24 to 48 hours)


Exclude your traffic in google analytics with cookies


More about this topic find in my article Exclude my own visits in GA records with cookies.

Thursday, November 19, 2009

Where are cookies stored on PC

Find where are cookies stored on your computer with IE, Firefox or Chrome internet browser. This article will guide you how to find and inspect cookies with help of your favorite internet browser. You can find instructions to find location of cookies for internet explorer, Mozilla Firefoox and Google Chrome.


Let's first explain what is cookie. Cookie is a message given to a web browser on client PC by a web server. The internet browser stores the message (cookie) in a text file. The message is then sent back to the server each time the browser requests a page from the server. The main purpose of cookies is to identify user.


Locate cookies with IE 8


  • In IE8 click Tools --> Internet options

    Tools - Internet options in IE 8
  • In General tab click Setting under browsing history

    Settings under browsing history in Internet options
  • Final step is to click "View files" button in Temporary Internet Files and History Settings window and directoy with cookies files will be opened.

Find cookies with Firefox


  • Click on Tools --> Options

    Tools - Options in Firefox
  • Click privacy tab, for drop down box choose Use custom settings for history

    How to show cookies in firefox
  • Click button "Show Cookies" and Cookies window will be displayed. There is search option, you can view details for specific cookies or remove selected cookie

    Firefox cookie window

Find stored cookies with Google Chrome


  • Inside Customize and control Google Chrome find and click Options
  • Select Under the Hood tab and click Show Cookies button

    Show cookies in Google Chrome options window
  • In cookies window you can search, inspect and remove cookies on your computer

Realed topics:
Show hidden files and folders on Windows 7